Electrical
 From the Ground Up: Electrical
Whenever we flip a switch, plug in an appliance, or adjust a reading light, we interact with the electrical system in a house. A good electrician can make those interactions easier in a hundred little ways, so it's best to communicate your needs early—ideally after the house is framed and before the drywall or insulation goes up.
Basics of Wiring
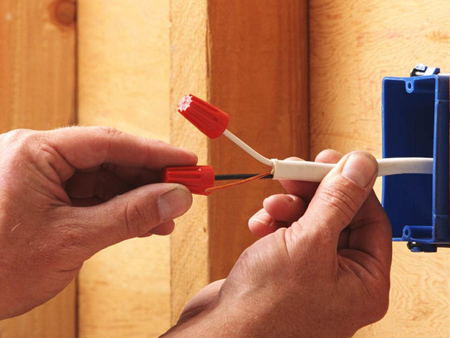
Most wiring in a home is either 12-gauge or 14-gauge. Always cut the power supply at the breaker box before beginning any electrical work. Test the local area with a neon tester to make sure that the power is off.
Typically you will follow the color code by matching each color wire with its corresponding color. Most light switches operate on the black wire.
Connecting to the Outlet
The wiring which you are installing will be affixed to the final outlet. The final outlet can be determined by finding the outlet with wired connected only to two of the four terminal screws.
Attaching Cable for New Wiring
Loosen the screws and remove the box. Connect the wire referred to as the earth wire to the terminal wire, which is chrome. Make sure that the new cable matches the size of the original cable.
Adding New Wiring From a Junction Box
New wiring can also be tied into a junction box so long as there is excess capacity. Do not connect mismatched hardware for 120-volt and 240-volt systems. Once the power is shut off, trace the white wires. Refer to the illustration. Clamp the cable.
Tying in New Wiring at a Ceiling Light
If your light fixture isn't controlled by a switch, you cantie new wiring. Make sure the power supply is shut off. Connect the wires according to the color code. Connect not only the ground wire, but also the light.
Always Match Connectors to Type of Cable Used
Depending upon the type of box you have purchased, it may or may not come with built-in connectors. You must always leave at least 6-inches of wiring inside the box so that you have enough slack to make connect
Make All Connections in Approved Boxes
Use only boxes that are approved for your electrical application and do not ever use an open-line splice. Properly position all features so that you still have access.
Running New Cable Between Multiple Floors
Drill a hole wide enough to accommodate the hardware from top to bottom through the recessed area. Then thread a cable through the newly drilled hole.
Adding New Wiring From Ceiling Boxes
Homes with attics may be more easily wired by using ceiling boxes. This method uses gravity to make the job easier. To use the attic method, first saw a hole at the desired position and install the cable box. Then run the cable by adding more holes in places such as the 2x4-inch board plate and ceiling material.
Adding New Wiring on the Same Wall
Cable can be attached between existing and freshly installed outlets by marking the wall studs. Find the spot (not on a stud) for the new box and mark it to exact dimensions. Cut a 3-inch hole for the new box.
Once you have tested the existing outlet to guarantee that the power is off, take the cover from the existing fixtures.
Install a wire through the old knockout box, threaded end first. Replace the the hardware that secures the wire.
Move to the new box and take away one of its knockouts. Self-clamping boxes need only be installed and tightened. Otherwise, use a Madison hanger.
Run the wire and clamp it. Assemble all of the hardware before testing the current. Attach protection over the cables and put the wall back together. Next, affix the cable to the other box. Thread the cable through the freshly cut hole and connect it properly.