Drywall And Repair
 Before You Shop
Consider these points and plan your purchases accordingly:
Decide whether you want to repaint the whole wall or just touch up patched areas. If you’re patching tiny nail holes, you can cover up the repairs by dabbing on touch-up paint with a soft cloth.
If you’re patching a large number of holes and other damage, prime the patched walls before repainting -- especially if you’re choosing a semi-gloss or shinier finish. The higher the gloss, the more different surface textures appear between the patch and the surrounding paint.
Small Dents and Dings
Scrape away loose debris from the hole. Cover the hole or dent with fast-drying spackle to bring the spackle level with the drywall surface and let it dry 24 hours -- or the time recommended by the manufacturer’s instructions. Sand smooth.
Popped Nail Heads
A popped nail isn't holding in the stud and backs out of the drywall, creating a popped nail head.
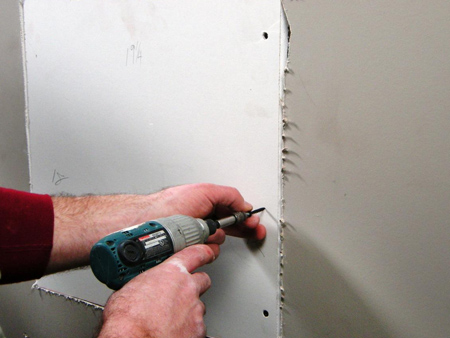
Step 1
Drive a drywall screw 1 1/2 inches above the popped nail head into the stud to reattach the drywall to the stud. Sink the screw head just below the surface of the drywall so it can be covered with spackle.
Step 2
Drive in the popped nail.
Step 3
Cover the sunken screw head and nail head with spackle until level with the wall surface. Wait 24 hours or the time recommended in the manufacturer’s instructions. Sand smooth.
Small Holes
For small holes, like those created by a doorknob, a patch kit may be used.
Step 1
Place the self-adhesive mesh patch over the hole.
Step 2
Use a drywall knife to cover the patch with lightweight joint compound in a crisscross pattern, feathering the edges so it blends with the wall. To feather the edge, increase pressure and angle on the drywall knife as you reach the outer edges of the patch area to minimize, or thin, the joint compound on the drywall.
Step 3
Let the patch dry and apply a second coat of compound if needed. Sand smooth.
Medium Holes
For holes up to 6 inches, use the California Patch.
Step 1
Cut a piece of drywall into a square shape that’s 2 inches larger in width and height than the area to be repaired.
Step 2
Score the back of the drywall with a box cutter or knife about an inch from each side.
Step 3
Snap off the gypsum, but leave the paper backing intact.
Step 4
Hold the patch over the hole and trace around the gypsum square. Do not include the paper border in your transfer. Cut out the traced square with a drywall knife.
Step 5
Apply joint compound to the back of the paper border. Fit the gypsum into the new hole and press the paper edges coated with joint compound into place along the outside edge of the hole.
Step 6
Cover the entire patch with joint compound until the lines are camouflaged, feathering the edges.
Step 7
This patch may require two coats of compound, with dry time in between coats. Sand smooth.
Large Holes
For holes larger than 6 inches, you'll create a drywall patch with a different attachment method for the repair.
Step 1
Cut a piece of drywall into a square a little bit bigger than the hole.
Step 2
Hold the square over the hole in the drywall and trace around the edges.
Step 3
Cut along the lines on the wall with a drywall knife.
Step 4
Inside the hole, attach a furring strip, a small, thin piece of wood, to either side of the hole with screws. Sink the screws beneath the surface of the drywall.
Step 5
Set the drywall patch in place and screw it into the furring strips, sinking the screws beneath the surface of the drywall.
Step 6
Apply joint tape to the borders of the patch. Joint tape is made of mesh and strengthens the bond between the patch and the wall, reducing movement and helping to prevent future cracks.
Step 7
Cover the patch and tape with joint compound, feathering the edges. Allow the compound to dry according to the manufacturer’s instructions. Apply a second coat if needed. Sand smooth.
Corner Bead Patch
Corner bead is used where two pieces of drywall meet to form a corner. Corner bead is available in a variety of materials, including metal, paper and vinyl.
Step 1
Cut the damaged corner bead horizontally, both above and below the mar, with a hacksaw.
Step 2
Use a utility knife to cut vertically along the drywall, connecting the top and bottom cuts from the hacksaw on the left and right sides. Remove the damaged piece.
Step 3
Cut a new piece of corner bead to fill the gap and attach it to the wall with nails or the manufacturer’s recommended fastener or adhesive.
Step 4
Apply joint compound to both sides of the corner, covering the bead patch to smooth rough edges and cover any seams, feathering the edges. Let dry and sand smooth.
Finish the Repair
Step 1
Finish all repairs with a final light sanding to ensure a satin smooth finish and seamless blending between the patch and the wall.
Step 2
Cover with a coat of primer, and let dry.
Step 3
Finish with paint.
Repair Textured Drywall
Step 1
Sand your patch area smooth. In a small bowl, mix 4 parts joint compound and 1 part water. Dip a stiff brush into the mixture and hold it close to the wall, bristles up.
Step 2
Flick the mixture onto the wall by running a gloved finger across the surface of the bristles. Typically, the faster the flicking motion the smaller the particles on the wall.
Step 3
For a knock-down finish -- one where a trowel presses joint compound down to form a texture that's more mottled than a flat wall -- lightly flatten the particles with a knife as the compound mixture begins to dry.
Step 4
As an alternative to flicking compound, you can use textured spray in a variety of finishes. Shake the can and spray the patch area in a circular motion 6-18 inches from the wall.
Step 5
Allow the textured compound to dry according to the manufacturer’s instructions, then prime and paint the surface.